
This guide will show you how to handle VFX for a character. The process of creating VFX can be tricky at first, but with some experimentation and practice, it will get easier over time.
Overview
There is a special VFX folder where all the related data for effects is stored – particles, meshes, materials and textures. We organize them in folders to make sure everything is clean and precise. Here’s an image of all of Fleet’s effects and how they are stored by attacks. The “skins” folder holds override effects for all the skins.
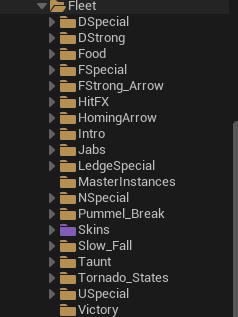
To create the effects, we use the Niagara particle system. I will not explain how it works, since that is a topic of its own, but I will show a few things that are important for the process.
Material specifics
We use different materials, but the main one is called M_VFX_Particle_Character. It has a lot of build-in functionality and you can play around with it to see what it can do. One of the main things to note is that we use a few functions to drive the colors of the characters for the FX.
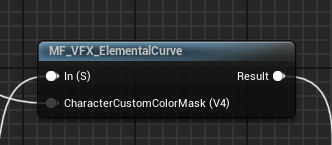
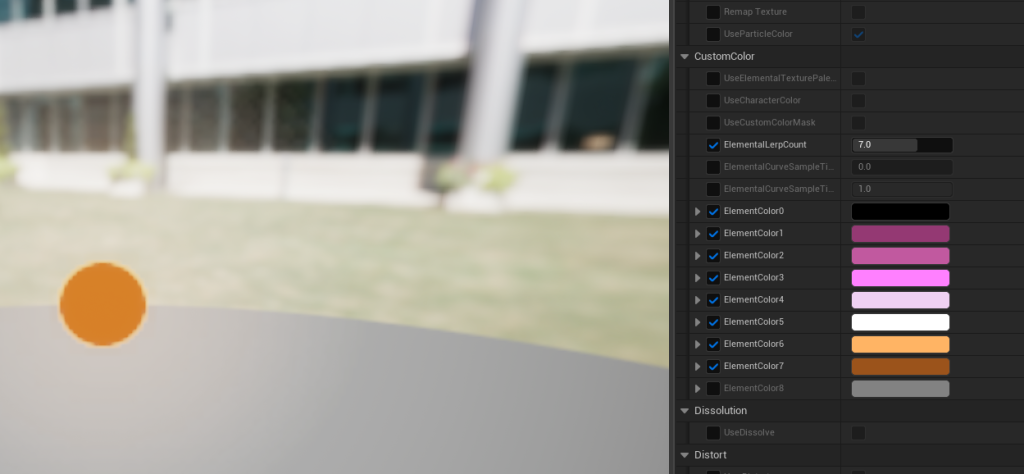
The MI_VFX_ElementalCurve one takes a grayscale image and uses a gradient to color it. The colors are determined by a LerpCount that is set in the Rivals LUA Character Data file. We usually make one Master Material for the character that is this dot with all the colors and then we make Material Instances of it to make sure that if we decide to change the color of the character, we don’t have to redo it for all materials.
In this case, you can see Fleet’s material has a Lerp Count of 7 and holds 8 colors in total. Most characters have 6 colors, but in some cases it is more. It is up to the artist to decide, but the more there are, the harder it is to control. The limit of colors is 9.
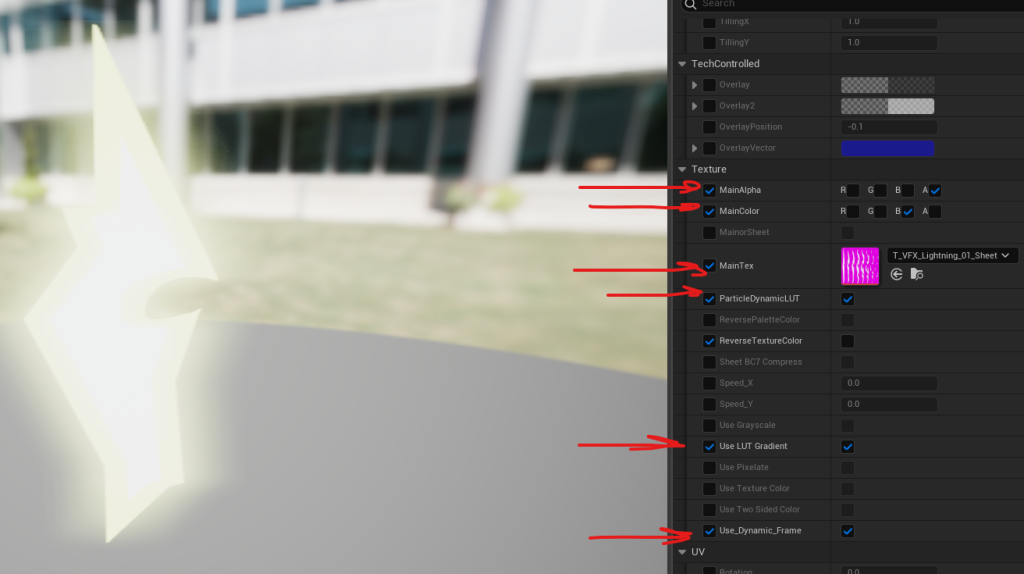
A couple of important parameters to keep in mind when making the materials
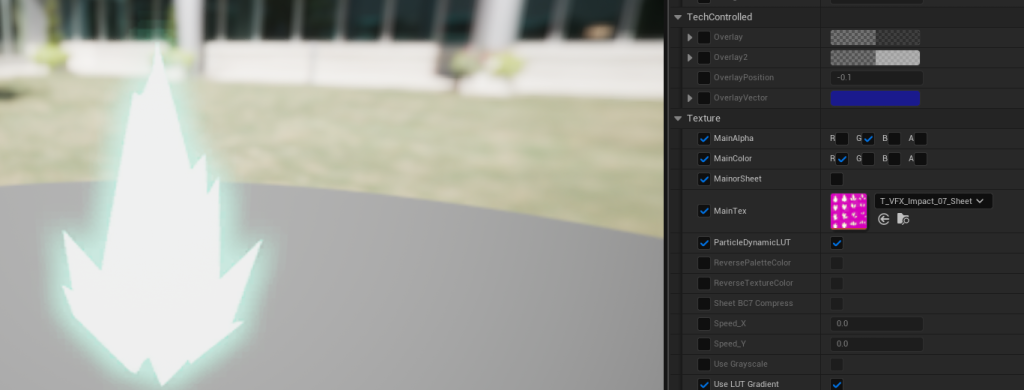
- Main Alpha → which channel of the texture should be used as an alpha (check the Texture section for more info)
- Main Color → same but for color
- MainTex → the actual texture
- Use LUT Gradient → If this is check on, we use the Elemental colors described above
- ParticleDynamicLUT → If this is checked, you can control the color intensity parameters inside the Niagara effect
- Flipbook → Used with Sprite Sheets, you can select the Columns and Rows of the sheet. We started using this mostly because of Meshes that use Sprite Sheets.
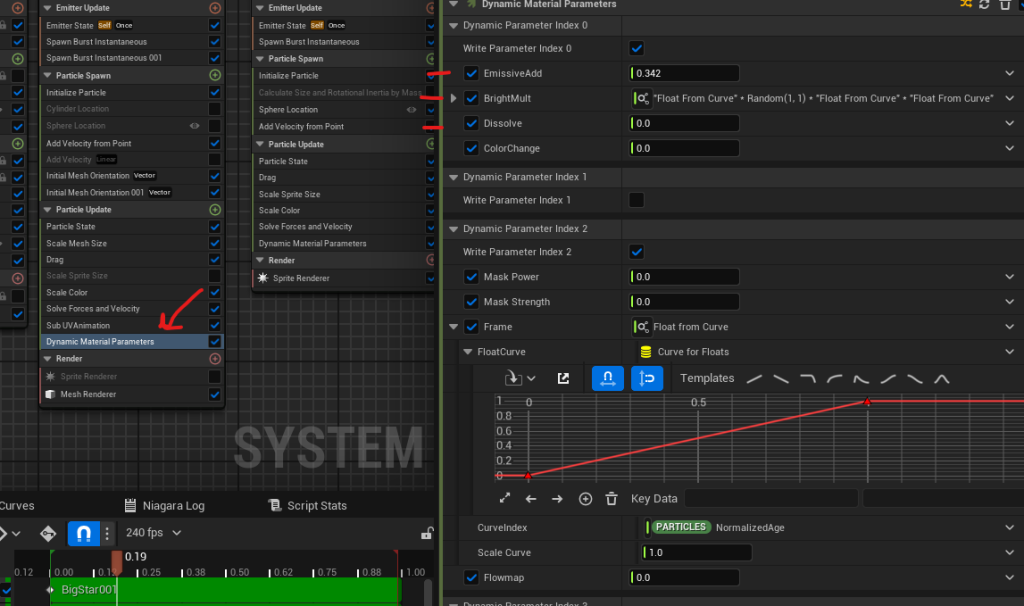
- Use_Dynamic_Frame → Used with Flipbook. You animate the sheet inside the Dynamic Parameters in the Niagara Effect (shown here)
The second function is a CustomColor one, which is used when we want to color a specific element of the effect with an element of the Palette Skin.
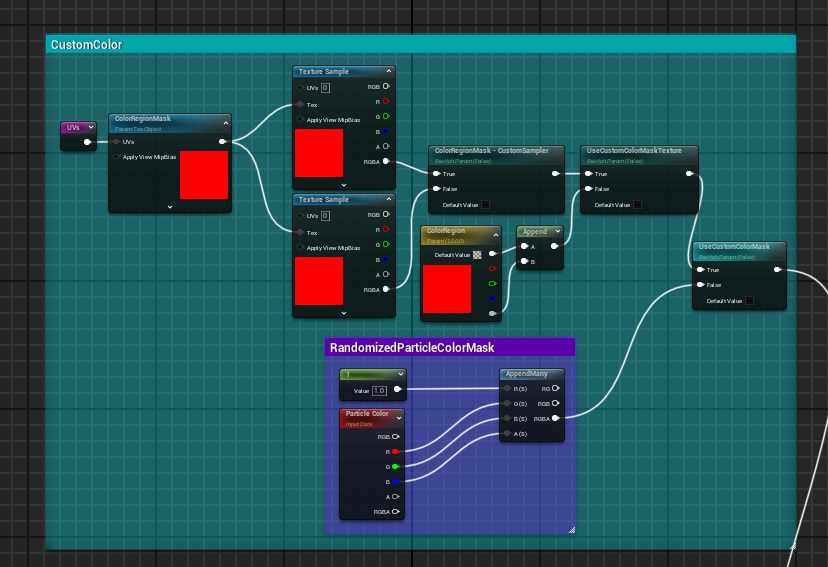
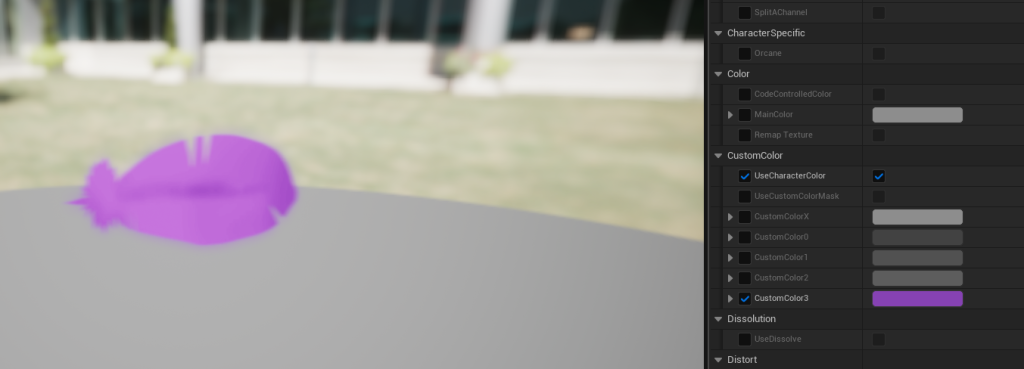
For example Wrastor has a feather hit effect and we wanted the color of the feathers to be used for that. The process for setting up materials to use that is explained here.
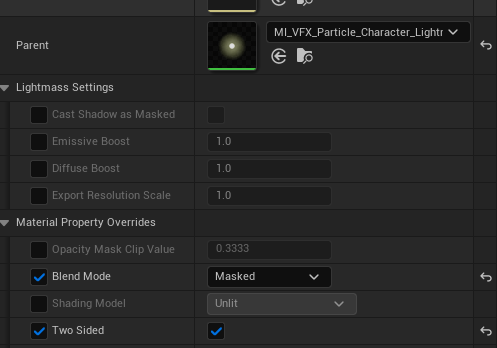
Lastly, most effects use the Masked shading and Two Sided option. Masked means there will be no glow or transparency and our game to an extend has mostly that kind of effects. For some cases, for example Absa’s lightning, we do use the Transparent option to get glow, but we almost never have actual transparent effects. The Two Sided means that it can be viewed regardless of which sided you are observing → used primarily with mesh effects, but also since the way effects are spawned when the character is facing the left, they need require that option.
VFX Textures
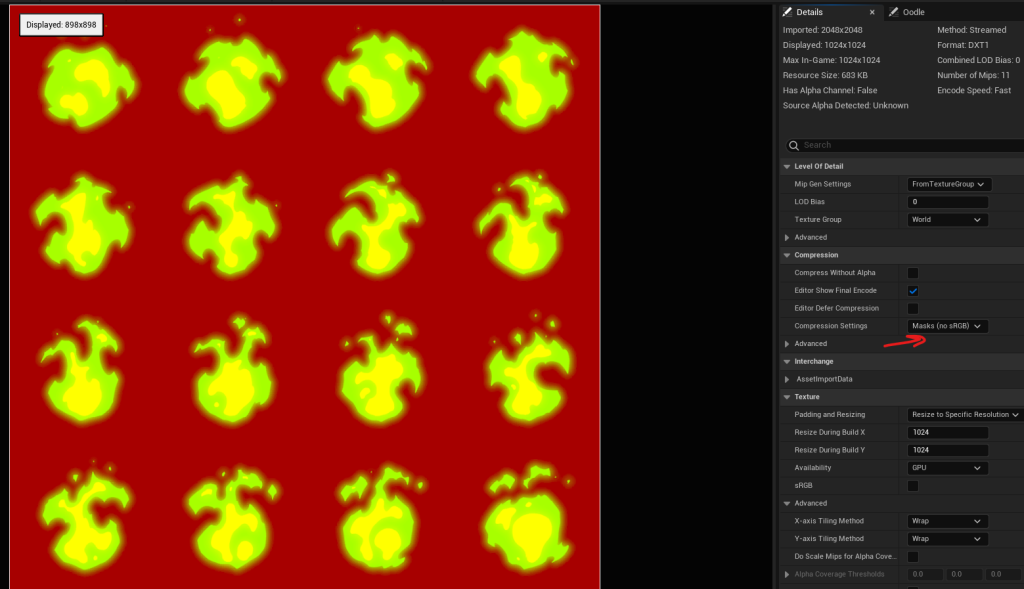
We use various textures in the process. We have single images that we call masks, we use noise textures, which look like a random mess, and finally sprite sheets which are animated and exported from external software. We try to limit our textures to up to 2048×2048 resolution to save performance. We also create the different layers in Photoshop so that a single texture can hold a lot of information. So in the image below we can see that the top left is how the final image looks like, but if you split it by channels, they are all used in different way later in the material.
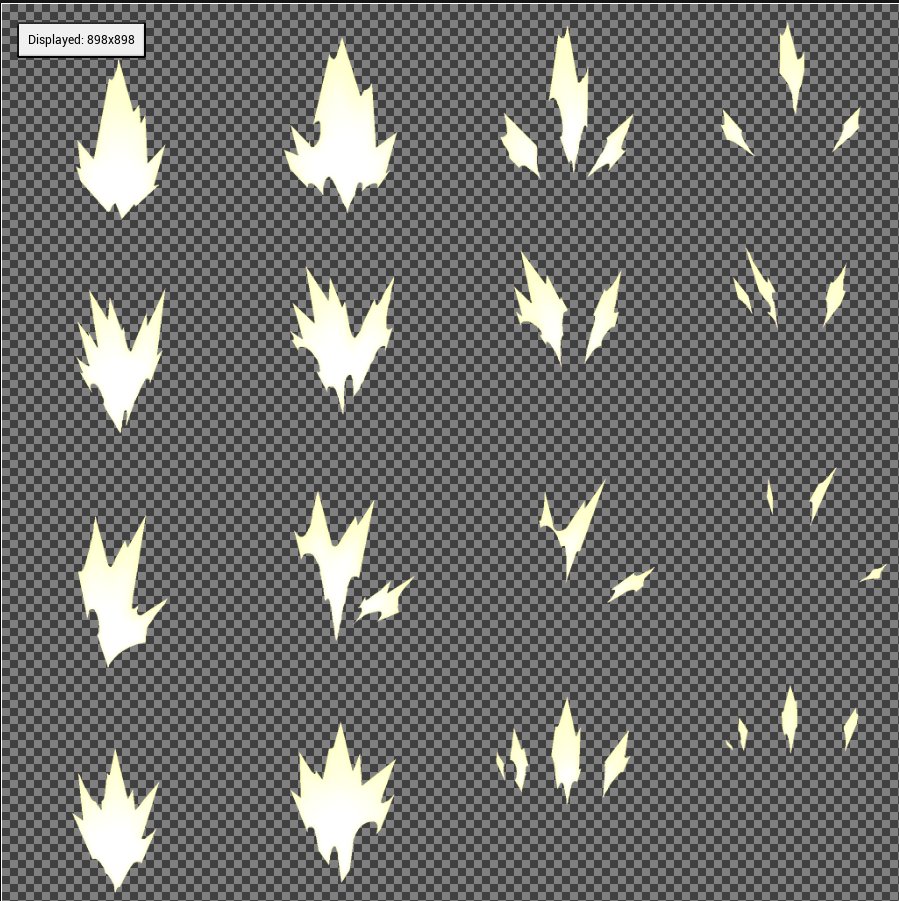
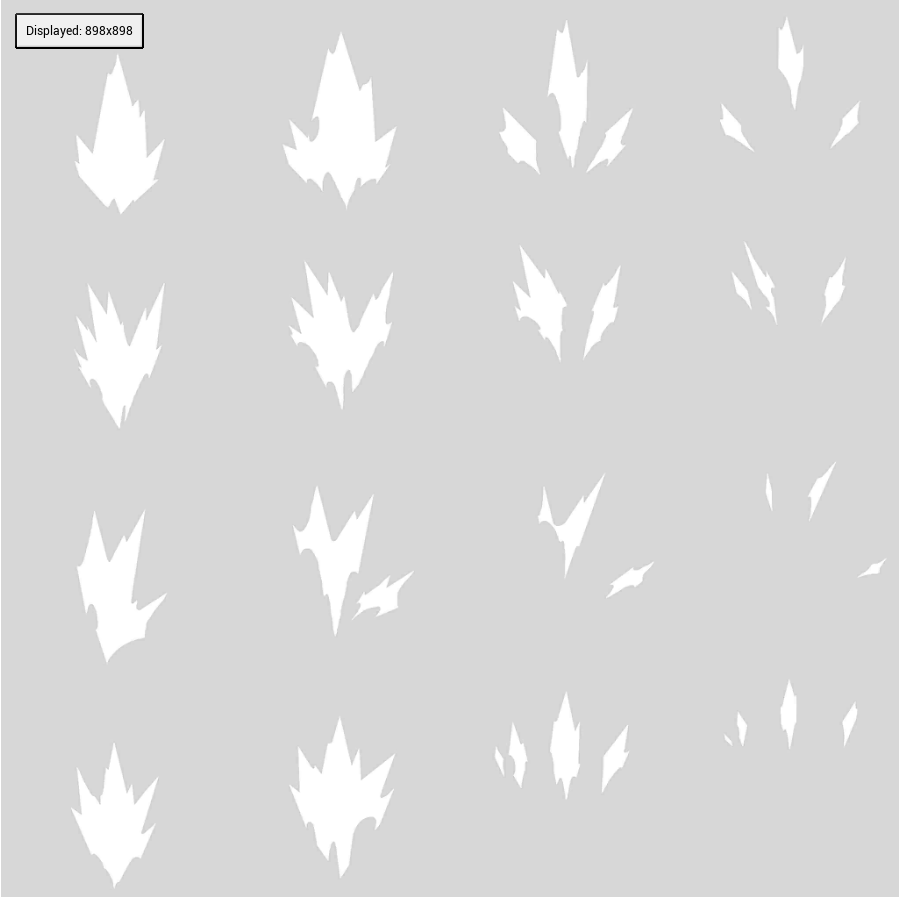
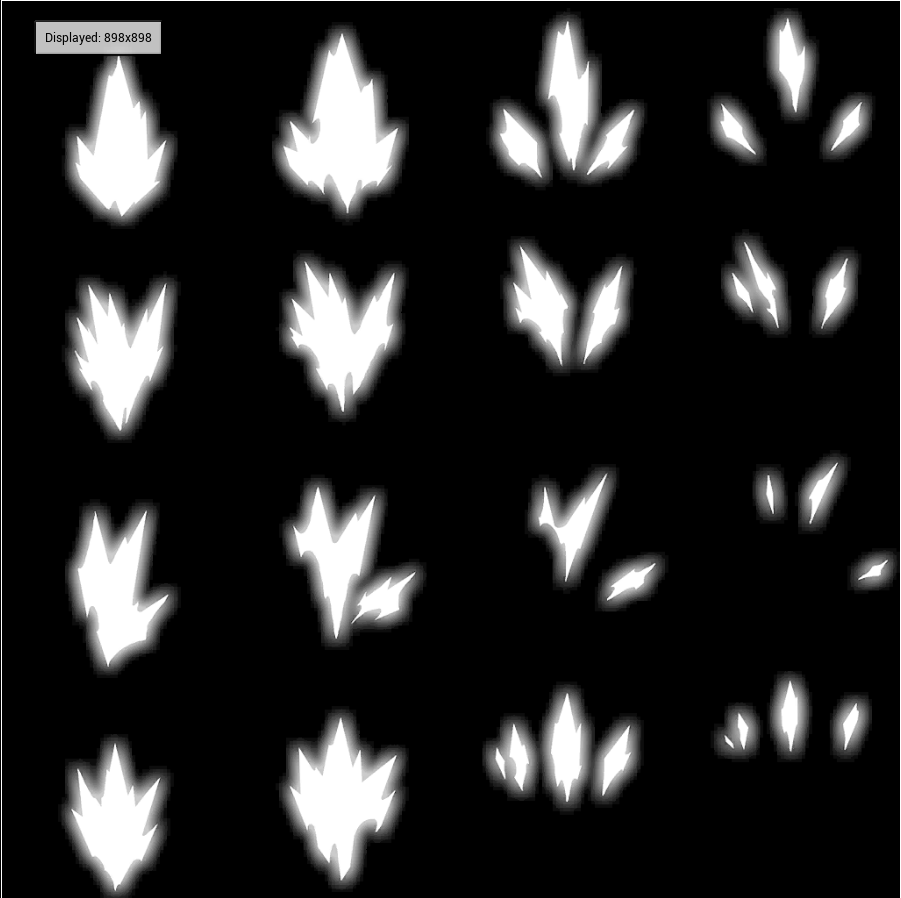
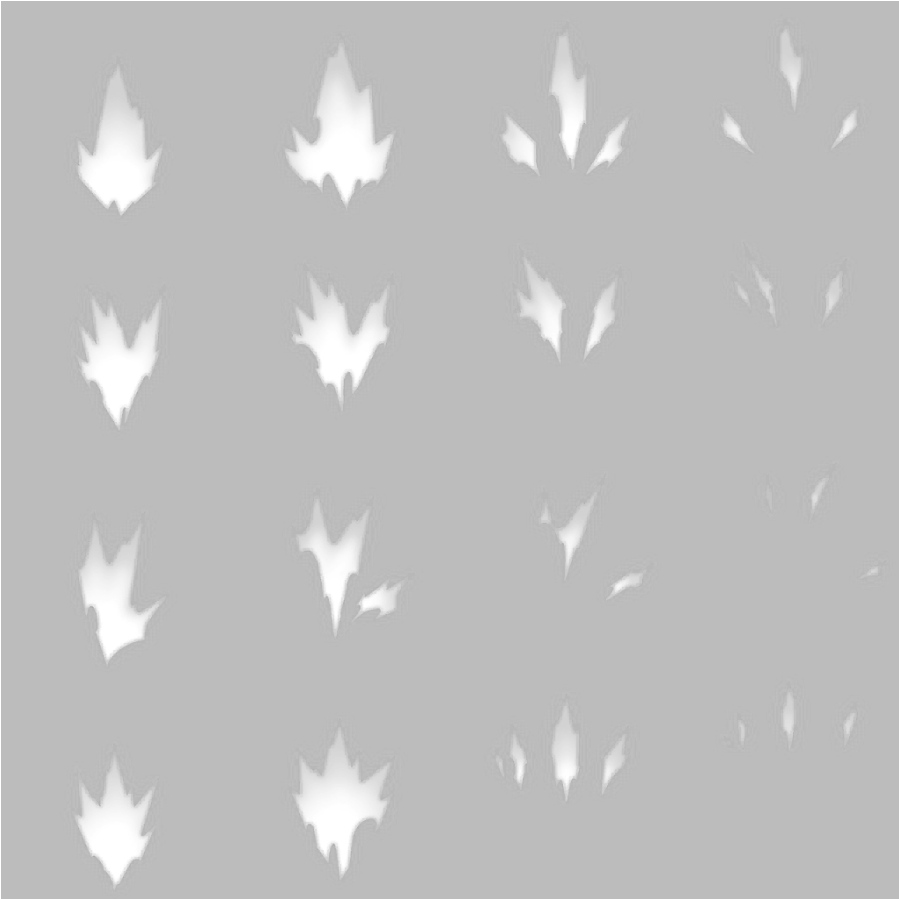
For optimization most textures are set to Masks Compression Settings
Particles
The particles are made in the Niagara editor. We usually time everything by feel first, but then add it in the attack data and test it until we get the results we want.
A couple of things to keep in mind while making the effects:
- All velocity is done in the particles. The reason is that when you add it afterwards to the Blueprints that holds them (the BPs are the thing that actually gets spawned), if you rotate the effect in it and it has velocity, it gets broken when facing the left, since it is multiplied by -1. So if you make the effect go to the right in the Niagara editor, it will face the right position when facing either direction in the game.
- We use Material Interface parameters to control the Skin colors. You need to make them in the User Parameters tab and assign them in the Override Material section. You need to follow the Particle Count order, to make sure the correct material is assigned in the game. You will not see this in the Niagara editor – only in game. So if they are assigned wrong, you will see the wrong texture appear on the wrong Emitter. Make sure you name your Emitters and best practice is to just order them when you create them. Otherwise if your emitters are placed in a messy way, you will forget the order. But that’s why you can always check the Particle Count. The naming needs to be Material1, Material2, Material3..etc.

- If your effect is big and you see that while you play it suddenly disappears sometimes, you can make sure that you have Fixed Bounds set to something like 10k + and – to cover the whole area

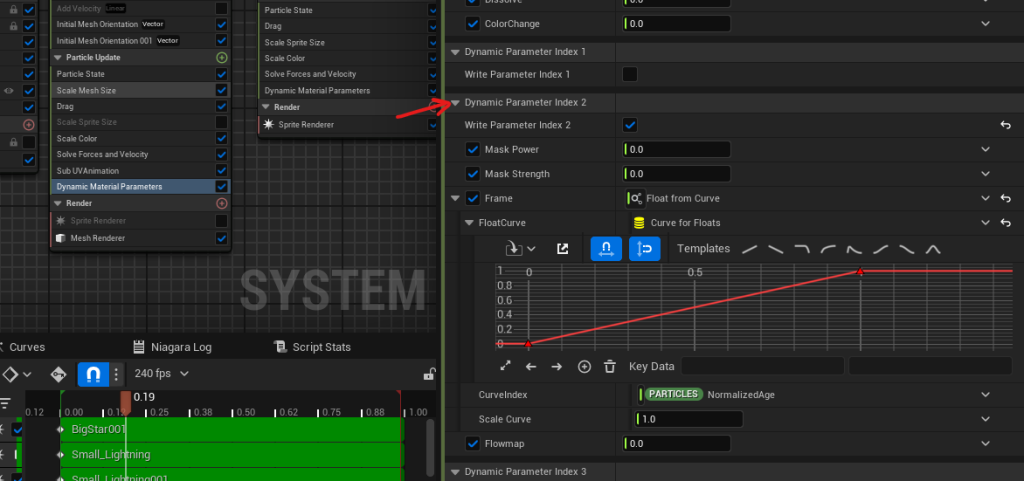
- We use the Dynamic Material Parameter a lot. In the Material section it was explained that we check some things to use control in the editor. The most common ones we use are the Emissive Add, BrightMult and Dissolve – they control the colors and dissolve parameters. The last on, found in the Dynamic Parameter Index 2 is the Frame, which controls the Flipbooks. There are other parameters that offset textures, noise and other parameters, and they are heavily linked with the Materials. Note that this is the setup on our main material – each master material we use has its own Dynamic Parameters that we tweak.
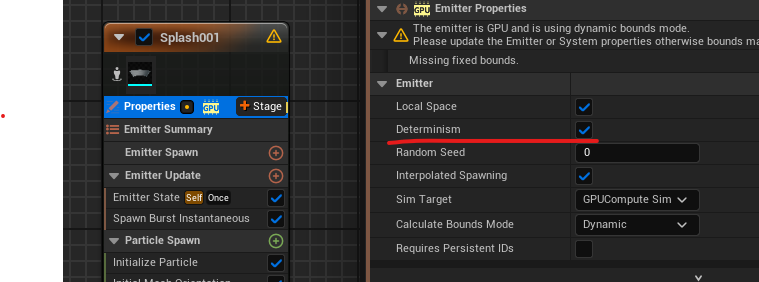
- Almost all effects have Desterminism checked. That means that each time the effect will play the same way. This is great for fighting games, as it lets you spawn the effect in a specific way that you know works good. But of course sometimes we want some randomness and we check it off
Blueprints
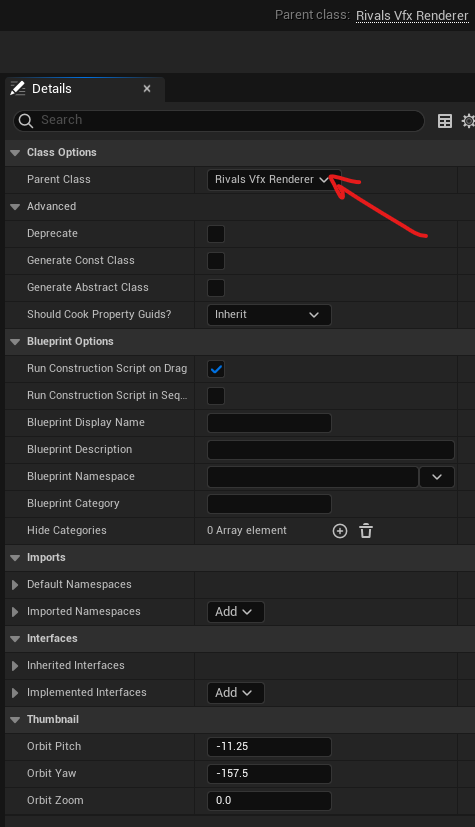
After an effect is made it needs to be added to a specific Blueprint. It is called Rivals Vfx Renderer. A couple of things to note about it
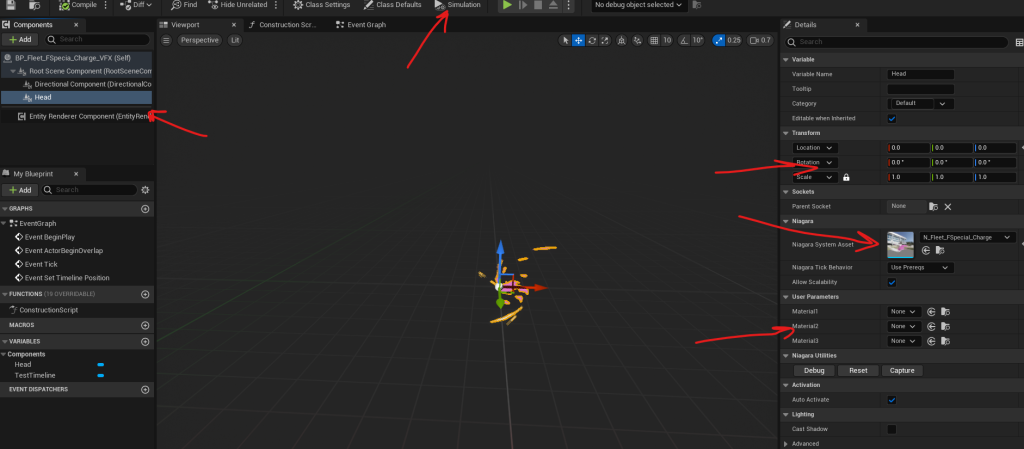
- You just add the effect in the Components section. Then select the effect on the right. You will note that the Material Interfaces you exposed will be visible here. No need to do anything about them
- Clicking Simulation above lets you see how the effect plays
- Sometimes the effect might need to be moved to a specific position to match the attack. You could move it in 3 different ways – in Niagara, BP or the Attack Data. The Niagara one works good if it’s just one or two emitters. It is the most dynamic one, since you can pause the game and move it in real time. But if it becomes more complex, it is easier to move the whole effect in the BP or Attack Data. We prefer most of the time the changes to be in the BP just to know that that’s where Edits are made, but sometimes we edit them in the Attack Data if it’s a very repetitive effect that will be used multiple times in the data – so there’s no need to move it inside the BP.
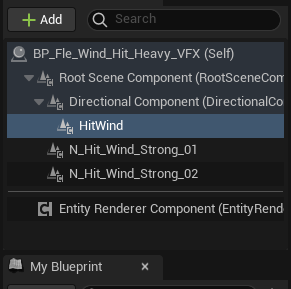
- Hit effects have an extra effect that needs to be added in the Directional Component. It is the effect that spawns when you hit an enemy in a certain direction. You can review the way we’ve set it up to do in the same way.
Adding the effects in the data
Okay, we have particles that have the correct material interface, we’ve added them to a Blueprint – it’s time for the final step. We need to add them to the specific attack or article data.
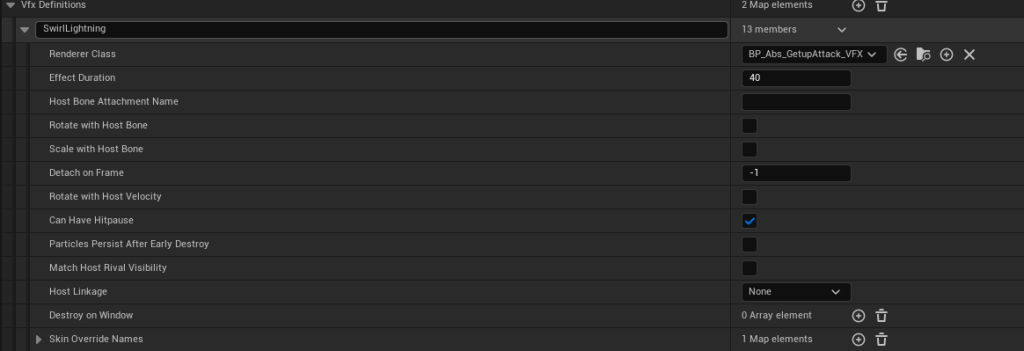
Let’s have a look at an example with Absa’s Getup Attack. When we open ATT_Abs_GetupAttack, we scroll to the end of the section that says Vfx Data. In it, we add the effect and we give it an arbitrary name. Then we plug in the Blueprint we did in the Render class. After that there are few parameters that can be tweaked for a variety of reasons. A lot of them are used very rarely, but we still required them, so they are there. I will go through all of them now and put a ❗ on the ones we used the most:
- ❗Render class: The BP with the effect
- ❗Effect Duration: This used to be a more important setting at the beginning of the project, since the timing of the effect was actually measured with this. But currently it only means how long the effect will be displayed, before it is destroyed. The actual time of the effect is set in the Lifetime of the Emitter in Niagara. Use this setting if you want to have the effect linger for a long time, if it’s a persistent effect or if have a small one if you want it destroyed quickly. Otherwise we generally just put something between 30-60 without thinking too hard about it. Test the effect later to see if the time is too short and increase it.
- ❗Host Bone Attachment Name: Attach it to a specific bone or socket on the character. Be wary of the rotation of that bone. You can also use the following key words instead of directly using a bone name, which can be useful if you need to attach the effect to an opponent instead of yourself, since you won’t know their exact bone names:
- Root – Attaches the vfx to the character’s origin. This is the most common value for this field if you want the effect to follow the character.
- GrabBone – Uses the character’s GrabBoneName, specified in their character data. This is the bone that opponents follow when they are grabbed/thrown.
- HeadBone – Uses the character’s HeadBoneName, specified in their character data. This is the bone for the character’s head.
- ChestBone – Uses the character’s ChestBoneName, specified in their character data. This is the bone for the character’s chest.
- CenterOfGravityBone – Uses the character’s CenterOfGravityBoneName, specified in their character data. This is the bone for the character’s center of gravity, usually placed at their hips.
- ItemSocket – Uses the character’s ItemSocketName, specified in their character data. This is the socket that items follow when they’re held.
- PoppySocket – Uses the character’s PoppySocketName, specified in their character data. This is the socket on the character’s back that Maypul’s friend Poppy gets attached to.
- ZappedSocket – Uses the character’s ZappedSocketName, specified in their character data. This is the socket that Absa’s zapped effect gets attached to, usually around the center of the character’s torso.
- BeehiveSocket – Uses the character’s BeehiveSocketName, specified in their character data. This is the socket that the beehive item is attached to after the character is hit by it.
- Rotate with Host Bone: Make sure the effect follows the rotation of the bone
- Scale with Host Bone: Effect scales with the bone
- ❗Detach on Frame: If attached to a bone, detach it after a certain frame. Used a lot with 0 to spawn the effect on a certain bone and then let it linger at that spot.
- Rotate with Host Velocity: Get the direction of the character and rotate it that way.
- Can Have Hitpause: The effect freezes during the Hitpause and resolves afterwards.
- Particles Persist After Early Destroy: Keep particles after the article gets destroyed, e.g. Ranno’s dart on hit
- Match Host Rival Visibility: Makes the particles invisible if the character is, e.g. Forsburn’s particles when he’s in the smoke
- ❗Host Linkage: Used in various ways to usually destroy the particle quickly if the player is hit, changes state, etc
- Destroy on Window: Destoy the particle on specific animation windows
- Skin Override Names: Used to change the particle for specific skins
Keep in mind that this process requires a lot of tweaking. Make sure to check the effects in combat with another character as well, specially when getting hit.
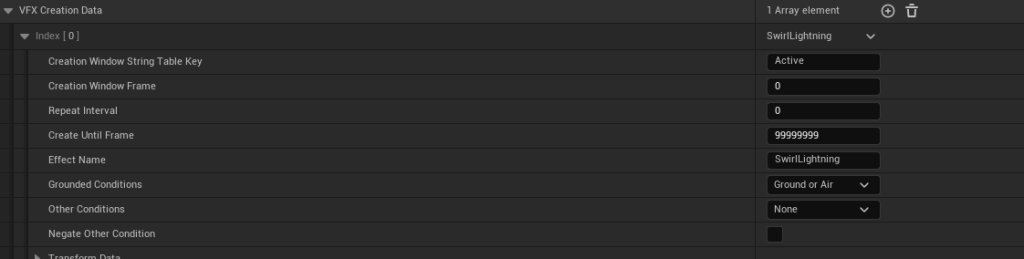
Lastly we need to add the effect to a specific animation window. Two sections up from the Vfx Data there is an Effects tab. It holds the SFX and VFX creation data. In it, we add an entry and then fill in the following data:
- Creation Window String Table Key: The name of the animation window
- Creation Window Frame: On which frame of the animation to spawn the effect
- Repeat Interval: Spawn the effect every X number of frames. WARNING: We do not use this anymore, since it was performance heavy. We now use Spawn Rate in the Niagara effect and attach it to the character.
- Create Until Frame: Destroy the effect on X frame
- Effect Name: The name we have in the Vfx Data below
- Grounded Conditions: Whether the effect should be spawned on the ground, in air or both
- Other Conditions: Character specific conditions. E.g. whether Orcane is on a puddle or not – spawn a different effect
- Negate Other Condition: In cases we want something specific to negate the above mentioned condition
- Transform data: As mentioned before, you can move the effect here as well, rather than the BP. Can be useful if you spawn the same effect multiple times and instead of creating a lot of BPs , you move it here. Used for example on Absa’s UStrong.
This covers how to add effects to articles or attack data. Next we will look at adding effects to the global character data.
- Adding effects in the Global Character Data
Sometimes effects need to be added to a specific Data class that the character uses. For example, the hit effects are there. A lot of these effects are code-driven and the code looks up the name in this data to spawn the effect. You can always override the existing Universal effects like Air Dodge, Land Dust etc. with that data – e.g. Orcane does that.
Create a BP with the class Rivals Vfx Definition Asset, or just copy one of the other character’s ones. Then add it to the CD_YourCharacter in Character Vfx Container Class.
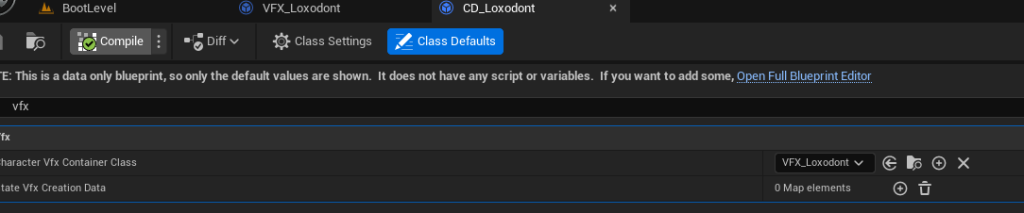
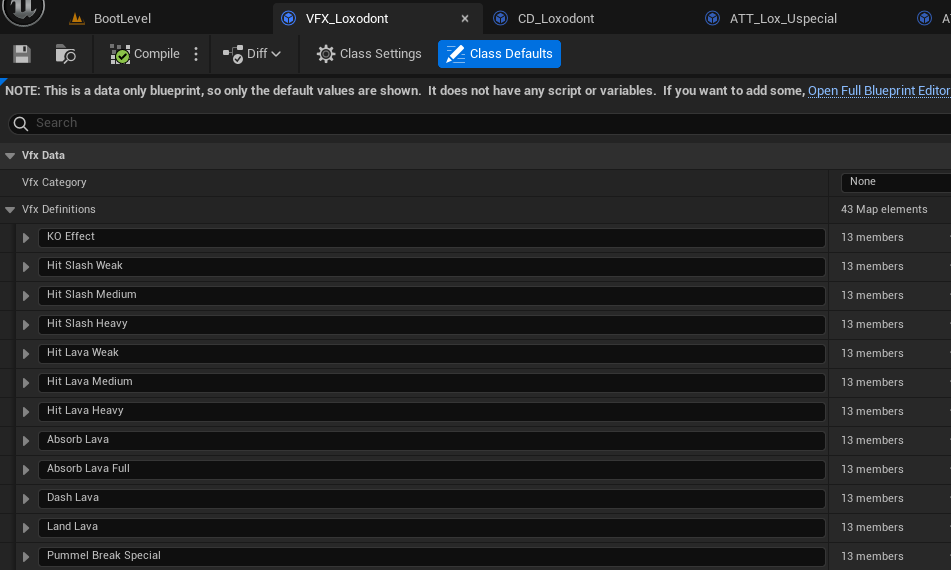
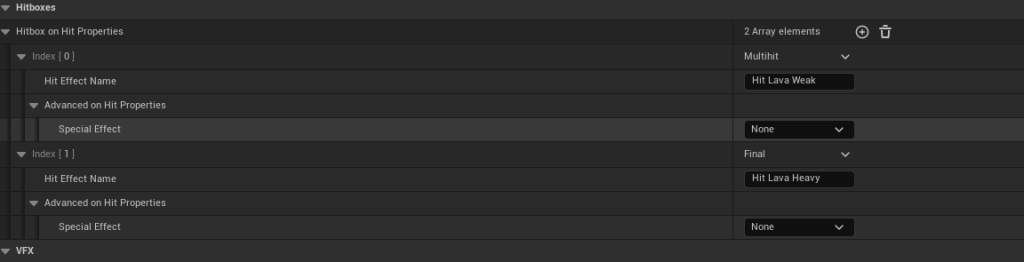
Unlike the Attack Data, these effects do not have a specific Window that you spawn them. As mentioned, they are mostly code driven. But, you can use the hit effects in the Attack Data to spawn the specific effect. For example some of Loxodont’s hits cause a Slash Effect and some use a Lava Effect. In the Hitbox section of the Data, you can add that information. They use the character’s VFX data shown above
Some of the other effects are Absorb Lava for example that is code-driven.
Elemental color data
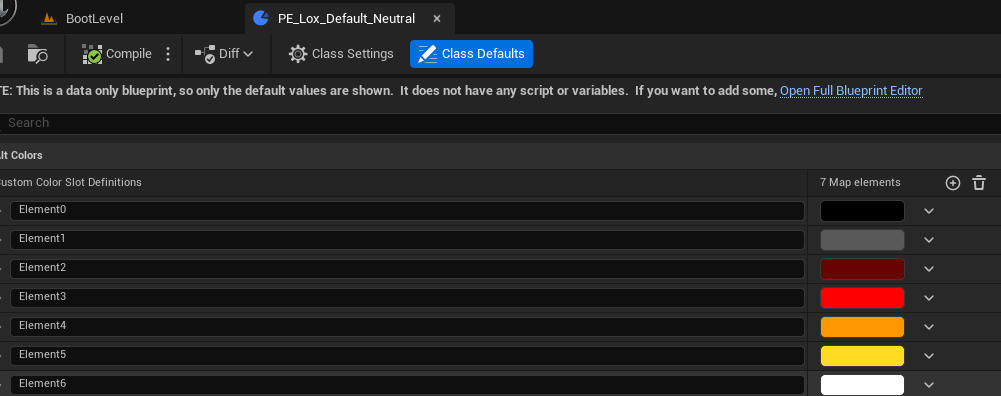
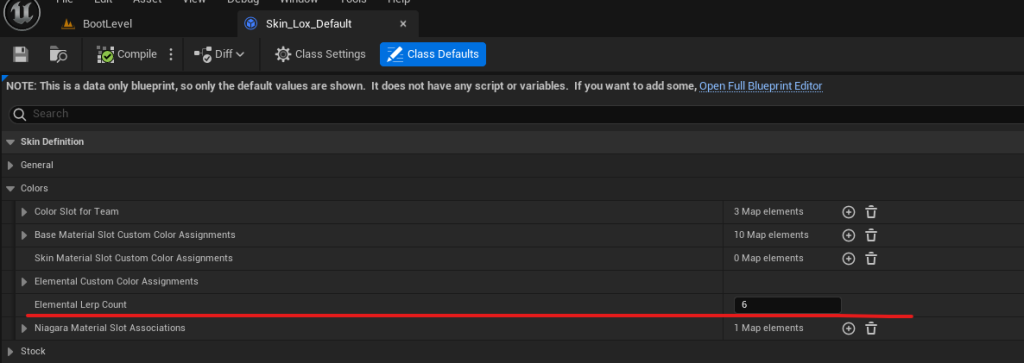
In the character Palettes folder, there is a PE file that contains the colors for the character VFX that we used in the material earlier. If you do not see such a file, you can just copy one from the other characters and tweak the colors. Then you need to add it in the CS file located in the same folder under Elemental Palette. Lastly, in the the Skin_Yourcharacter_Default data, there is an Elemental Lerp Count – set it to the amount of colors you chose minus one. So for 7 colors, the lerp count is 6.
Palette Skin effect recolor
As mentioned in the Materials section, sometimes we want an effect to recolor based on a character’s Palette skin color, not the Elemental one. For that, we go into the Skin_YourCharacter_Default data and add a few things.
The first one is in the Base Material Slot Custom Color Assignments, we add an entry called VFX for example. In it, we can only use up to 4 Custom colors. Then we called them CustomColor0 to 3 and write down the name of the Skin Palette entry we want to use. So in Ranno’s case, we use his pants and body color – their color is driven in the PS file.
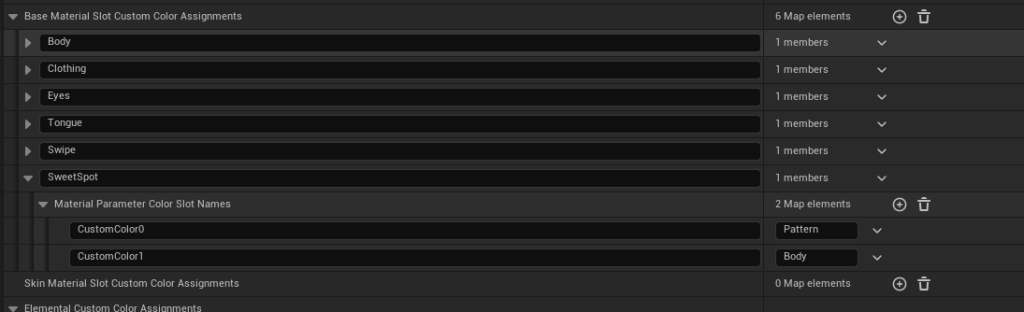
Then, in the same data file a bit below is a Niagara Material Slot Assosciations. You can make a new entry and call it the same as the name you put above. Then, you add all the materials that will be used with the Custom Color setting in here. Now they should recolor in game based on the color you input above. Custom Color 0 to 3 corresponds to the texture mask color that you would use – Red for CC1, Green for CC2, etc.
Note that the system currently works with only one set of VFX recoloring, so if you do more than that, it might not work.