
Often we want to animate a character’s materials to control visual effects.
A couple of common examples include:
- Controlling visibility of the character (or sections of it)
- Pan Textures
- Control emissive (Glow map) intensity
- Animate Texture Flipbooks
Animation Curves – Unreal Documentation
This is required if you want to
Material parameter curves need to first be added to the skeleton asset in Unreal before you can directly animate them via animation clips.
For example if you want to animate a character’s visibility mid animation with the “DiscardUVGlobal” parameter , you will need to add the name of the material parameter as a curve inside the skeleton asset as well as set the type of curve to Material. Any float parameter on your material instances can be animated this way.
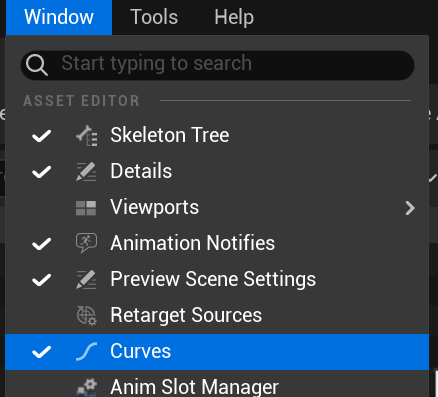
You can do this by opening the skeleton asset, and opening the Curves window
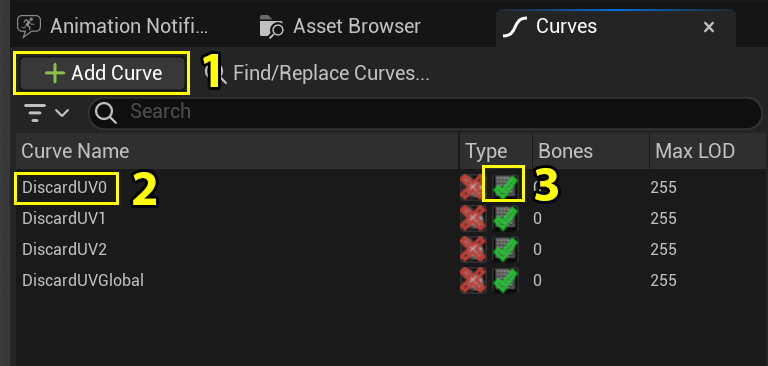
- Click on Add Curve
- Enter the name of the material parameter you would like to animate
- Add a check mark to the right column under type (enables material curve type)
- The name of the curve is critical and must match exactly the parameter name in the material instance.
- Only Floats can be added this way, Vectors must be animated as multiple float curves that are appended together in the material – existing ROA2 Materials do not have any such vectors.
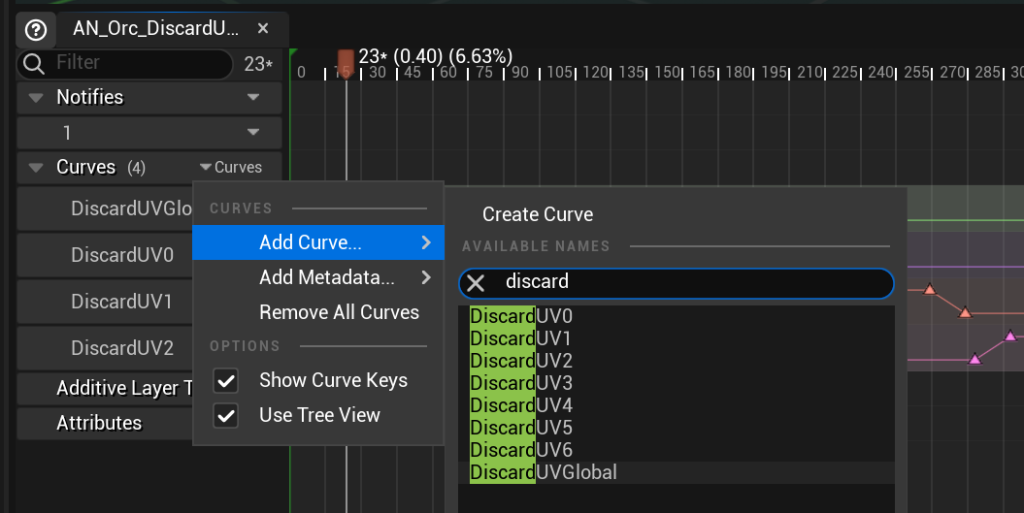
- Add the parameter curve to your animation clips by clicking the add curve button, you can then preview and animate the material in real time directly in the editor.
- If you wish to animate these values outside of Unreal you can add them as blank Shape Keys in Blender, you will need one shape key named for each of the material parameters you intend to use. We aren’t actually going to animate Morph targets with these, instead we will use their imported curves to control material parameter animations. Because we are using Shape keys we will need to enable “Import Morph Targets” on our animation files.
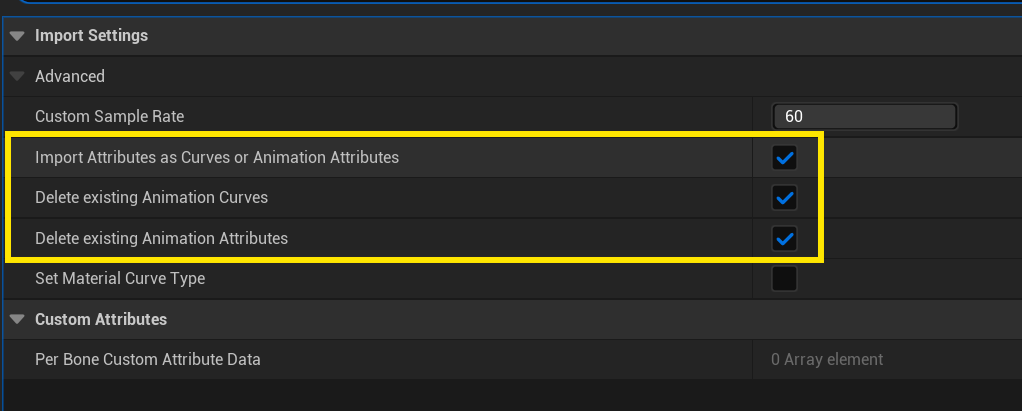
- If you animate your materials in blender, ensure that you set your Animations to Import Custom Attributes on import to Unreal.
- If you do not set “Delete custom Attributes” unreal will only import your custom attribute curves on initial import, and will ignore them on subsequent reimports so be sure to enable this as well.
- Animating materials outside of Unreal can be tricky due to a lack of real time previewing of the material – unless you set up your own custom materials for this in blender.
Animation Modifier Blueprints
You may experience unpredictable behavior if only certain animation clips contain curves for a material parameter. Ensure that all clips contain at least a single keyframe on all animated material parameter curves to explicitly set the parameter to the intended value on all states.
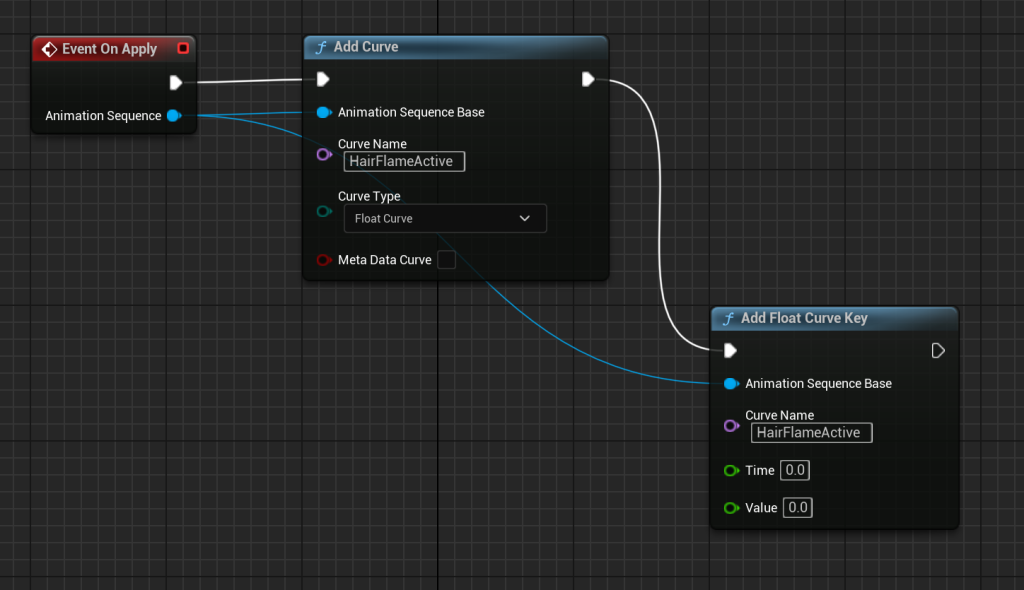
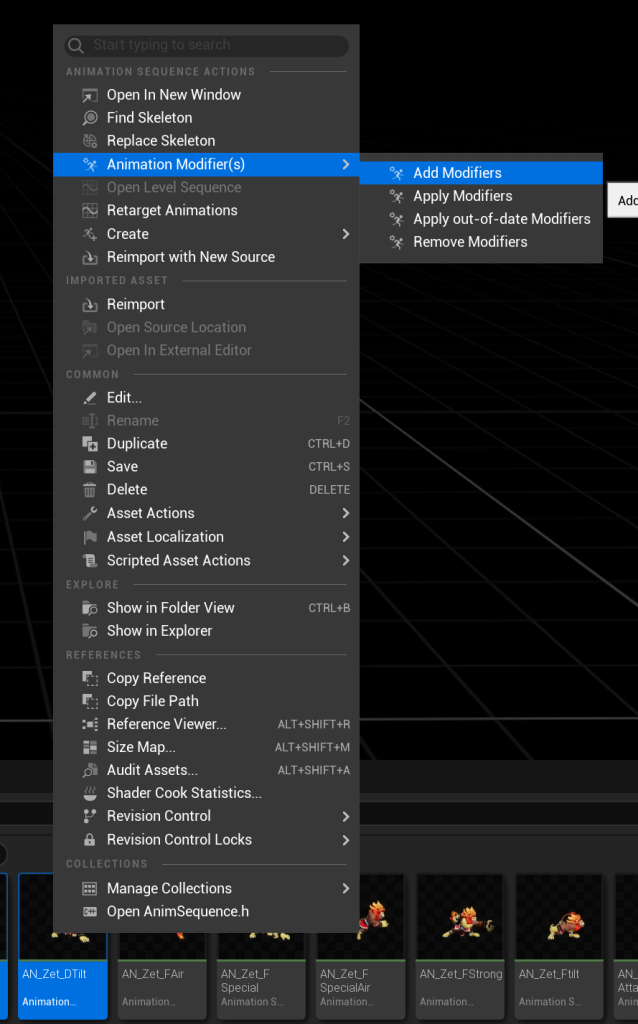
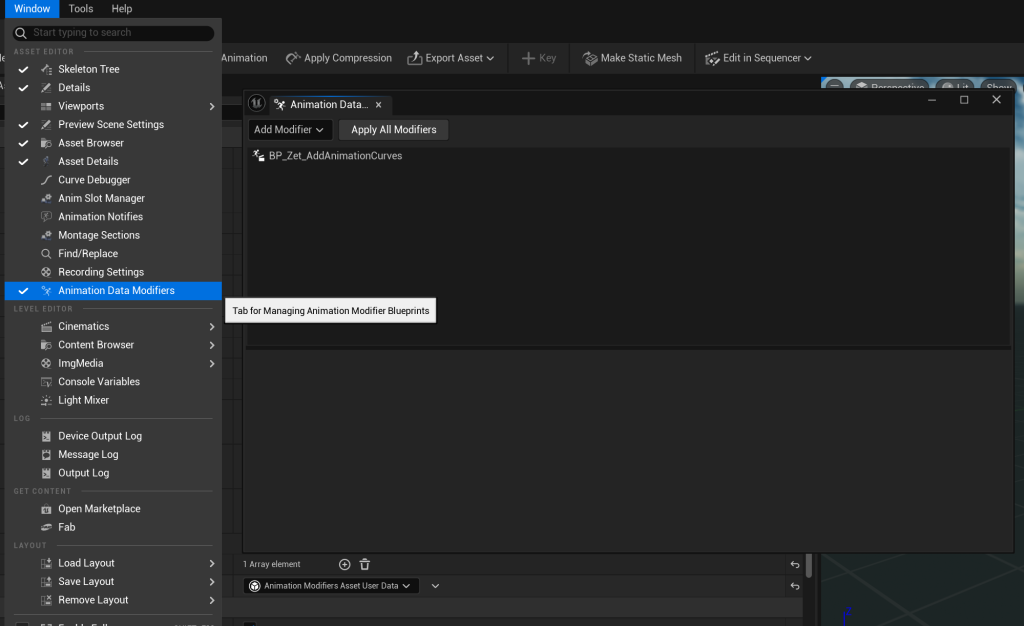
- You can use Animation Modifier Blueprints to quickly add curves to animations in bulk, refer to BP_Zet_AddCurves in Zetterburn’s animation folder for a working example.
Animate Materials Via Blueprint Logic
Material Parameter Curves in the skeleton act globally on all materials assigned to that skeletal mesh.
If you want to target only specific materials you can achieve this in the character’s Blueprint Renderer.
Instead of relying on the skeleton to pass animation curves to the materials we can use blueprint logic to achieve the same thing targeting only specified material slots.
Clairen’s blueprint renderer has an example of this method being used to read a custom animation curve and apply it to the visibility of her plasma blade as well as the emissive effect on her visor.
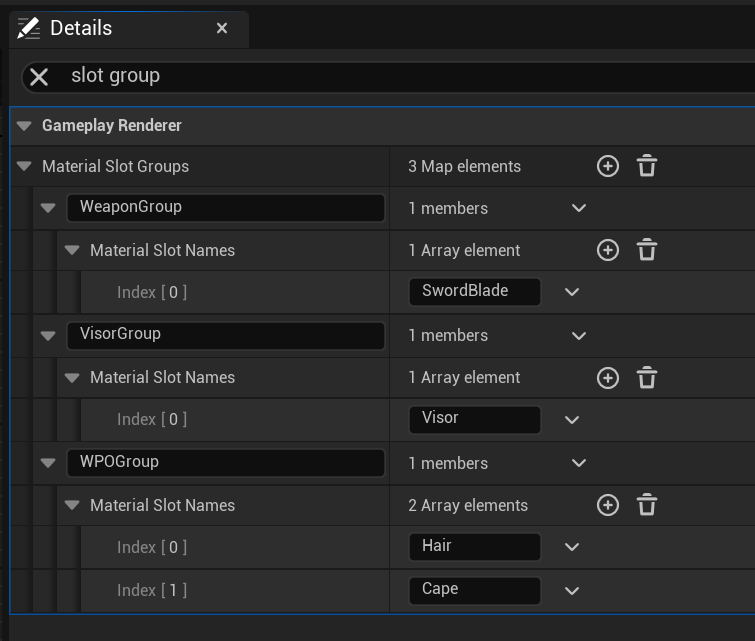
Open your character renderer blueprint and select the root node.
Search “Slot Group” in the details panel with the root node selected.
Add Group names for the different sections you want to control, and then add material slot names to those groups. In the example above the VisorGroup controls emissive on Clairen’s Visor, and contained within the group is her “Visor” material slot. This refers to the Visor Slot on her default skin skeletal mesh.

Finally we can add node logic in our Rivals Character Renderer blueprint to read the animation curve value and use them to control parameters on the materials assigned to these slot groups.
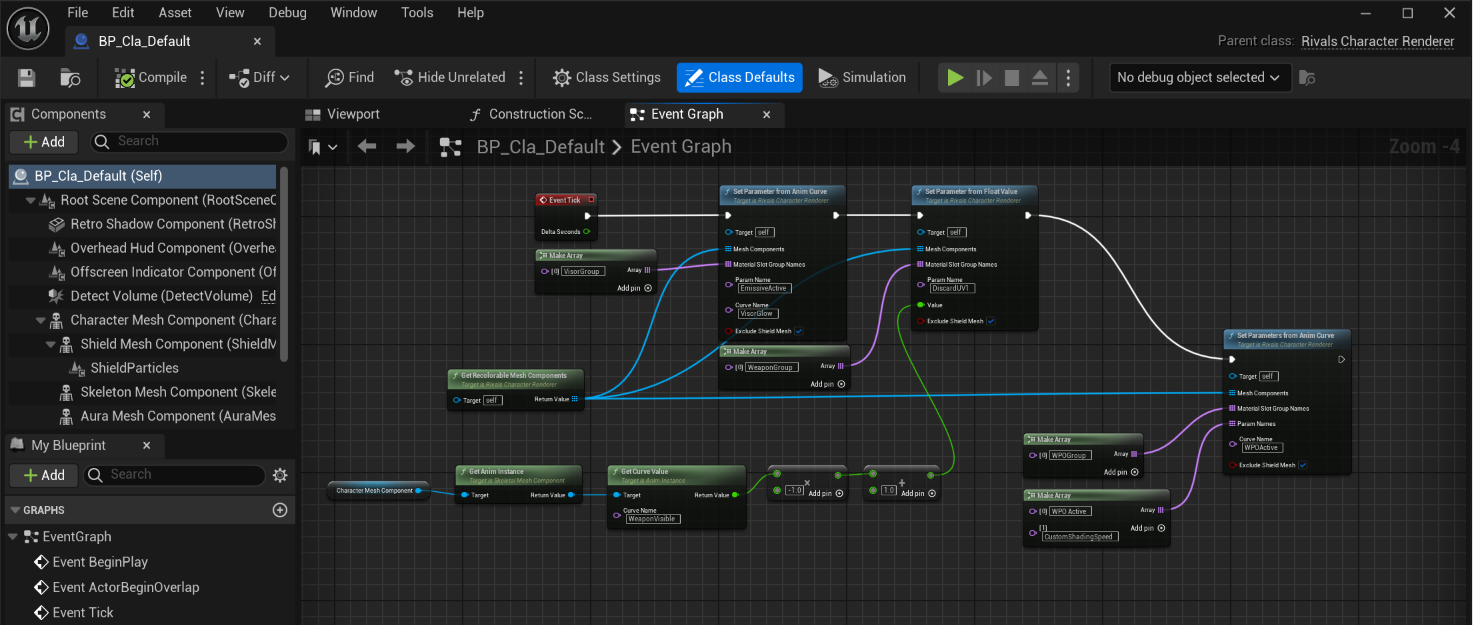
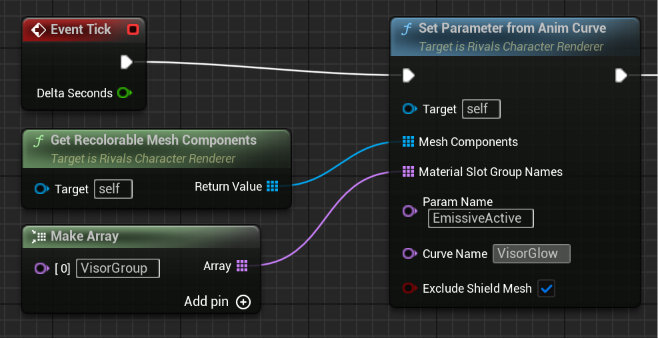
In the example of Clairen’s Visor glow above, (Her visor emissive deactivates during her fully charged FSpecial):
A shape key named “VisorGlow”, is added to Clairen’s rig animated is animated from 0-1 in Blender.
The VisorGlow animation curve is imported into unreal along with her animation sequences.
A Material Slot Group named “VisorGroup” containing her visor material slot is added to her blueprint renderer.
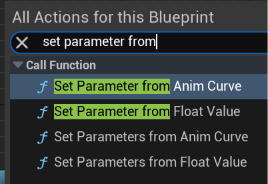
Using the Set Parameter from Anim Curve node, logic is added to her renderer to read the VisorGlow Curve, and apply the value from it to the “EmissiveActive” parameter on any materials assigned to slots listed in the “VisorGroup” material slot group.
Note: You are not limited to controlling parameters through animation, any values accessible in the blueprint renderer can be passed into these nodes to drive material parameter values.