
In Unreal you use Textures to control the surface visuals of your geometry by assigning them to Material Instances and assigning these Material Instances to material slots on your Skeletal Mesh.
All materials must be authored in Unreal, Blender Materials do not translate to Unreal.
A Material Instance (Not to be confused with it’s parent asset type – Material) is a type of asset that allows you to modify parameters established and logic in it’s parent asset.
Instanced Materials Unreal
Materials in Unreal
This document assumes you will be using Material Instances of the MAT_Cha_Standard Material which contains all of the logic needed to take advantage of existing features across the base cast including outlines, toon-shading, status effects, texture sets, dynamic colors and much more .
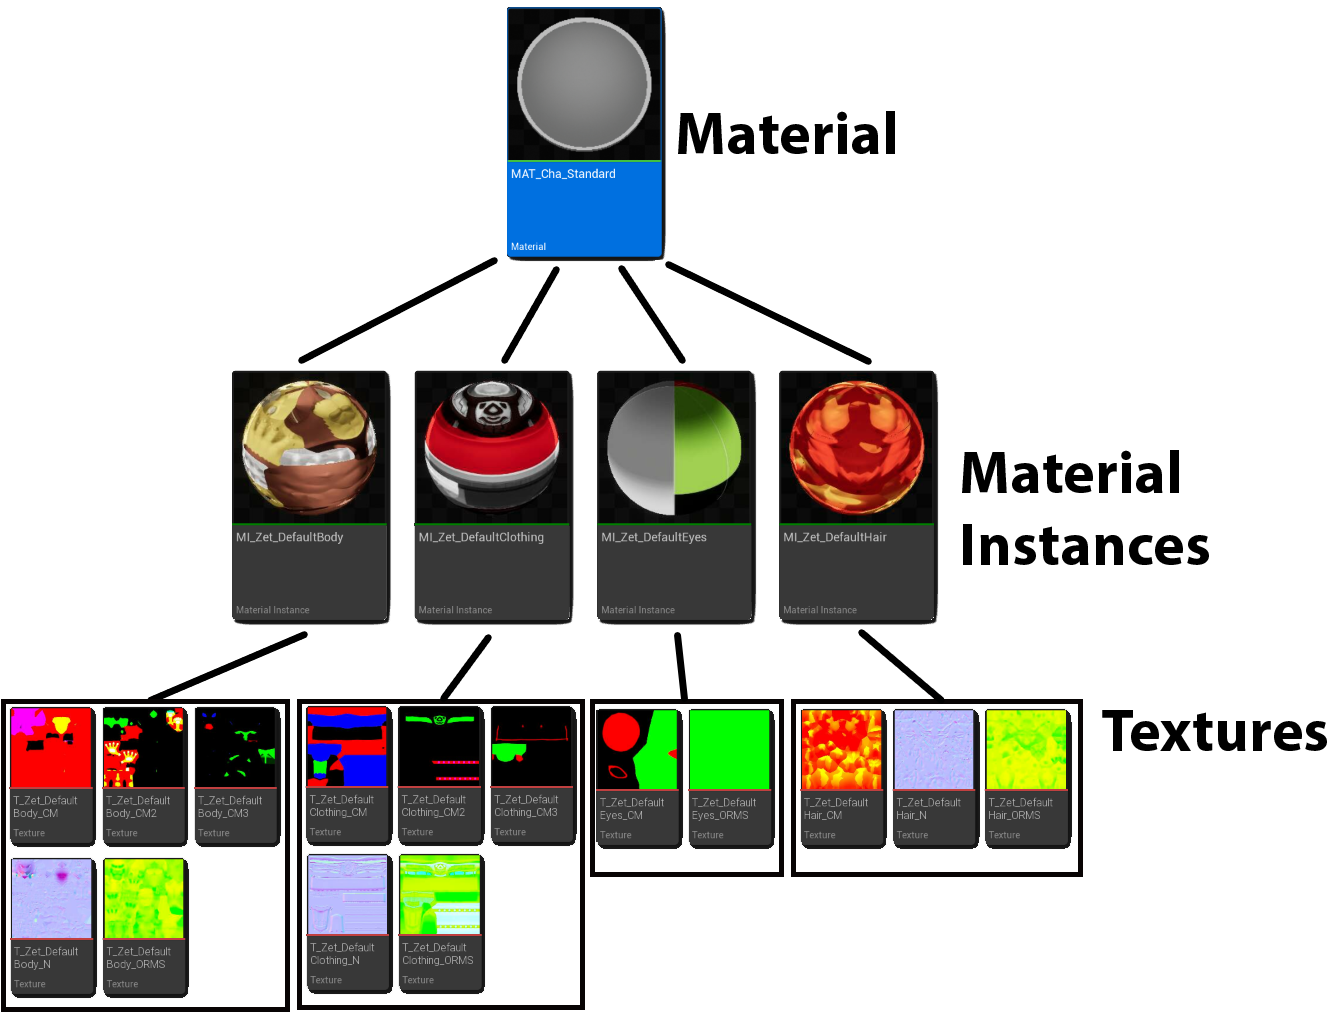
Rivals Characters along with most articles and mesh effects all use Material Instances of the content/character/MAT_Cha_Standard Material
A material instance inherits the parameters of the parent and allows you to override them, these overrides are how you will assign textures and otherwise change the look of your surfaces.
Organize your Material Slots
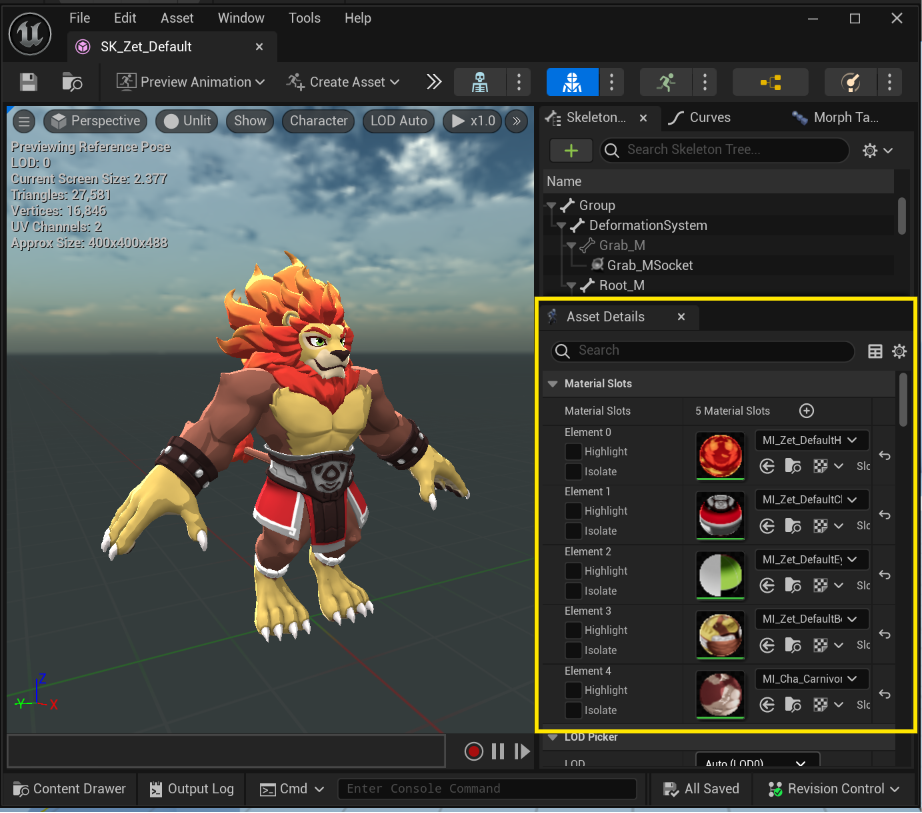
In order to assign materials to a Mesh in Unreal it will need to have properly configured Material Slots, Material Slots are created on import based on the Materials assigned to the mesh in Blender at time of export. The number of material slots has an increasing cost so we want to keep the list to a minimum.
If you need to add or remove material slots you must do so by assigning different materials to those regions of the mesh in Blender. You can assign materials to Objects or to faces directly in order to do this.
If a material slot has a white trash can next to it you can safely remove that slot by clicking on the Icon.
Material slots will import with the name of the Material assigned in Blender. If the slots change on re import, Unreal will attempt to reorder them, or retain your current order based on your selection.
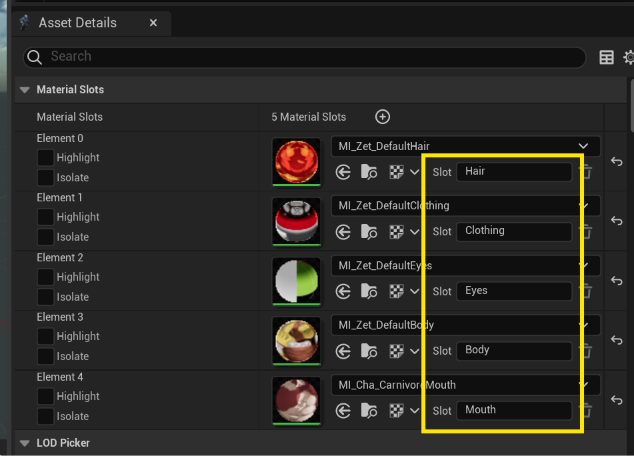
It is recommended to name material slots descriptively for future palette setup.
Generate Material Instances
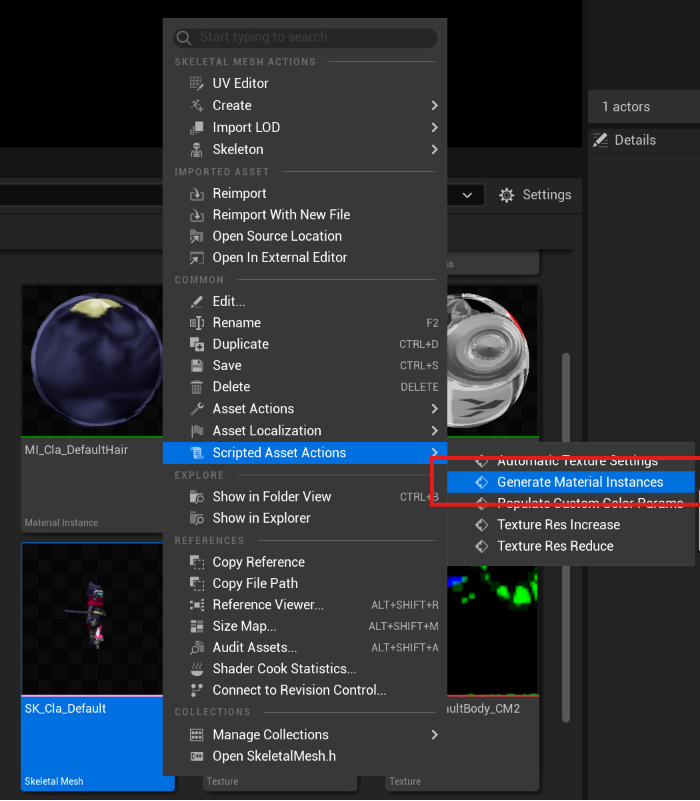
You can create a set of materials for your mesh automatically by right clicking on your skeletal mesh, going to scripted asset actions and clicking Generate material instances.
For each material slot on the mesh this will automatically generate a material Instance parented to the MAT_Cha_Standard Material named after and assigned to that slot.
Creating Material Instances Manually
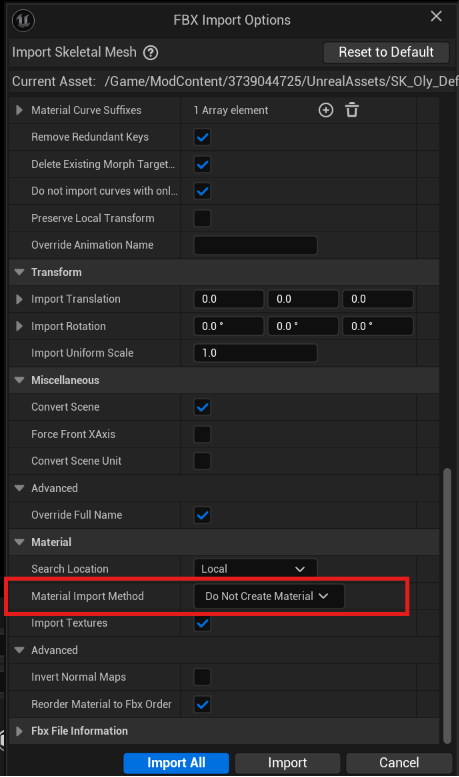
- When importing mesh Unreal will try to create materials for you. These will be unusable for our purposes. Ensure that you disable “Create Materials on import”.
- If materials have already been created on import, delete them.
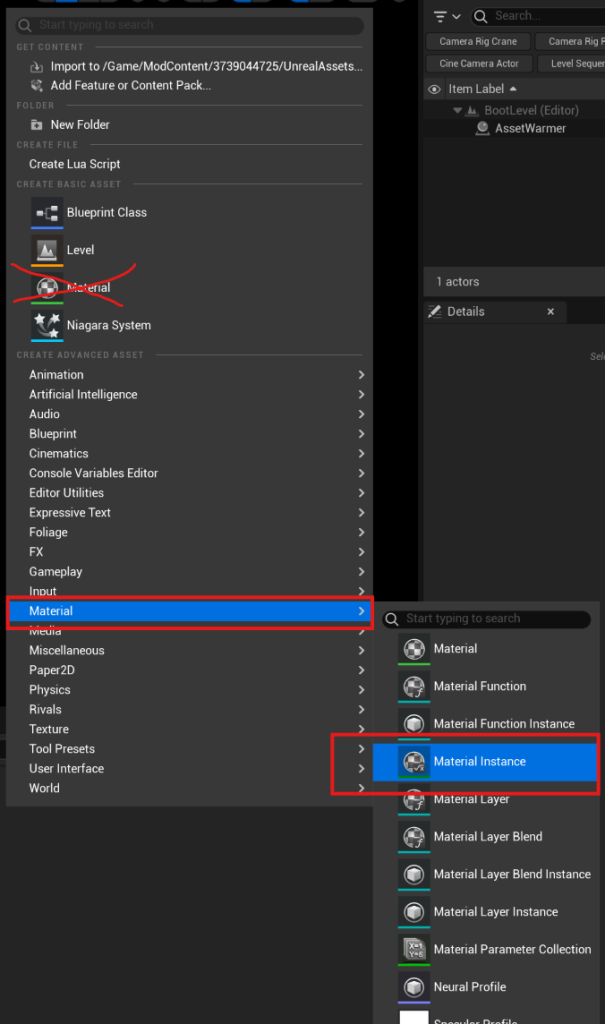
- In the content Drawer Navigate to your mod’s Unreal Assets folder and Right click in the black space, and go Material / Material Instance. (Do NOT click the Material Button in the root of the right click menu)
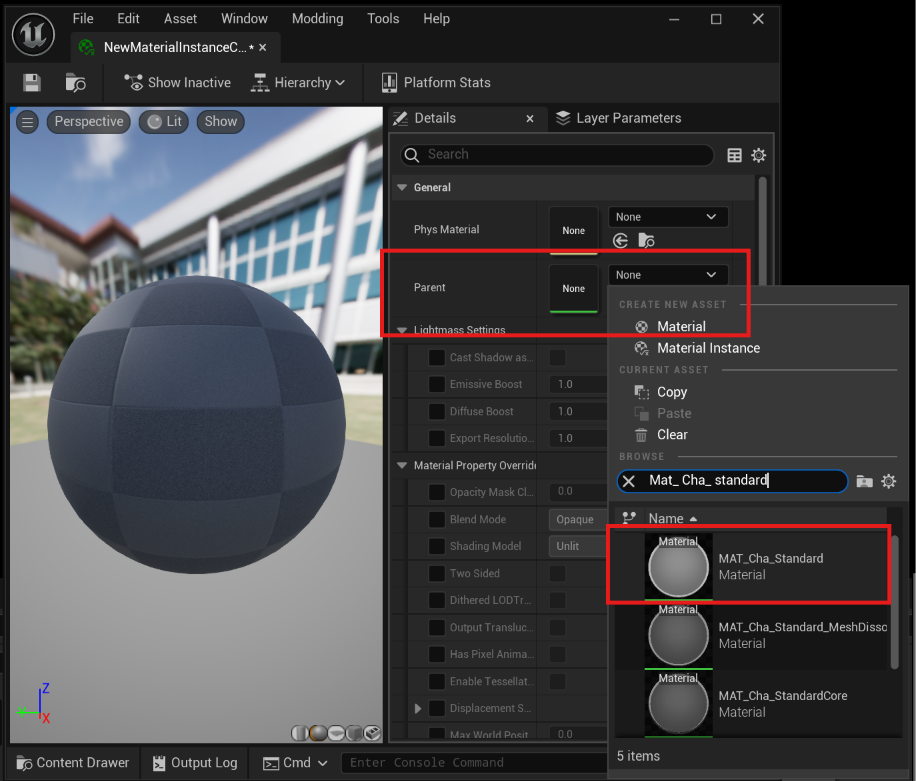
- Double click on the newly created Material Instance thumbnail to open it and assign MAT_Cha_Standard as their parent material.
- Open your skeletal mesh and assign your Material Instances to the material slots under the asset details panel.
- If your Blender Material names match Material Instance names that already exist in the editor, Unreal will do its best to assign them automatically.
- The number of material slots should be kept to a reasonable minimum as each one will incur draw calls.
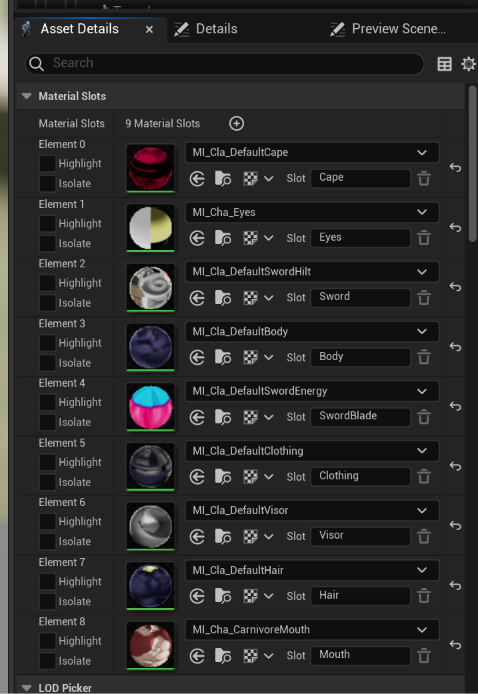
- You can rename material slots by double clicking the skeletal mesh and opening the asset details panel.
- You cannot combine or delete slots in Unreal, this must instead be done in Blender via material assignment.
- You can assign the “MI_Cha_Invisible” material to a slot that you need present but want to be visually hidden (Can be useful for alt palettes that hide portions of the mesh).
- You can disable shadow casting for individual material slots via the LOD section below however this will not affect capsule shadows.
Assign and Configure your Texture Parameters
You will need to assign textures to each of your generated Material Instances.
Use the following steps to edit a Material Instance parameter:
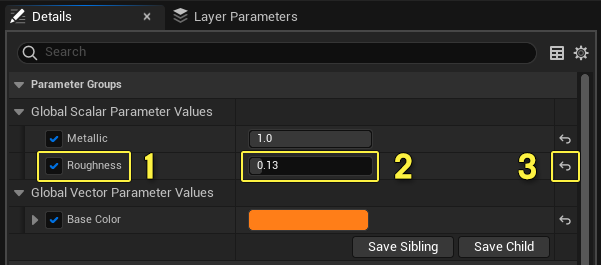
- Place a check in the box next to the parameter to enable it for editing.
- Type a new value in the field or left-click and drag to slide the value up and down. For Vector parameters, left-click the color swatch to activate the color picker.
- To reset a parameter to its default value, click the arrow icon pictured here.
As you adjust parameters, the Material preview will update in real-time in the Material Instance Editor, and in the Level if the Material is currently applied to any Actors.
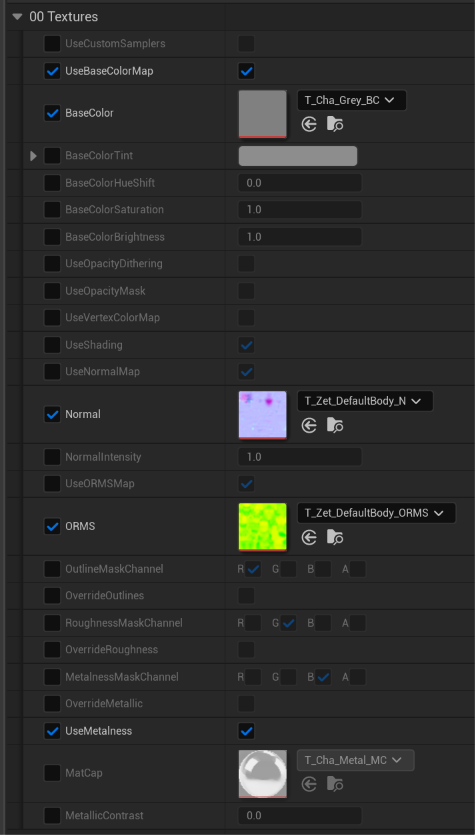
The majority of the parameters you will need access to can be found in the
00 Textures Category at the top of the parameter list.
Base Color
Accessible by enabling “UseBaseColorMap” parameter in the material instance.
Enabling this map replaces the custom color function.
The following material parameters will allow you to tweak the results of the base color texture in Unreal:
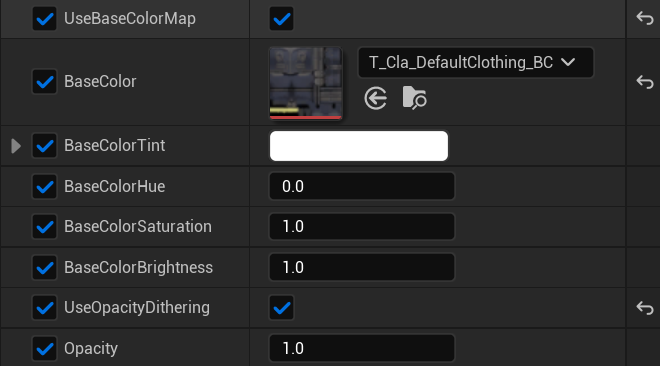
- Use Base ColorMap – Disabled by default, enable to use a Base Color Map
- BaseColor – Assign a Base Color Map texture
- BaseColorTint – Tints the texture with the selected color – works like a Multiply layer
- BaseColorHue – Shift the hue (Color) after the tint result
- BaseColorSaturation – Increase or decrease the Intensity of color
- BaseColorBrightness – Increase or decrease the brightness
- Use Opacity Dithering – Switches Alpha channel from a binary cutout mask (see below) to a dithered (Feathered) cutout mask – simulates translucency
- Opacity – When Dithering is enabled allows a global adjustment to translucency
The rivals standard material uses Masked blending mode, which means there are no semi transparent (translucent) pixels. Instead transparency acts as a binary discard mask, values in between 0-1 are rounded up or down based on the Opacity Mask Clip Value which by default is set to 0.333.
Normal Map
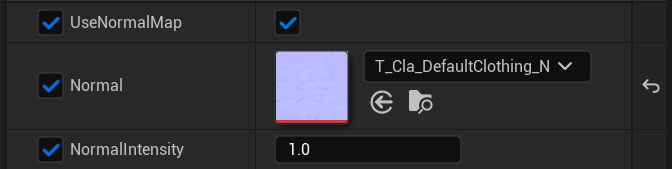
- UseNormalMap – Enables use of Normal map, disable if not needed
- Normal – Assign the normal Map texture
- Normal Intensity – Adjust the intensity of the normal map
ORMS Map
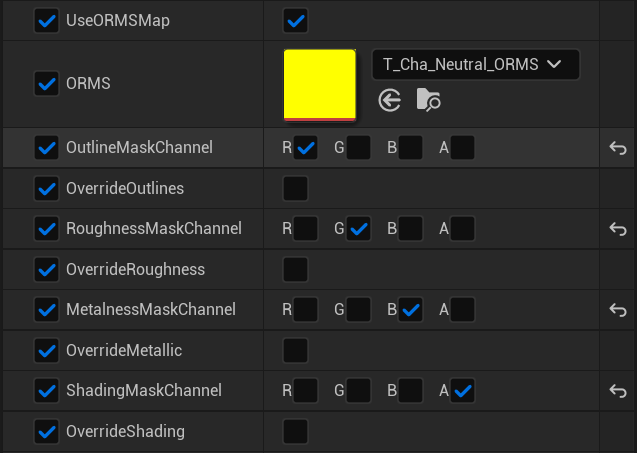
- UseORMSMap
Disable if you want to use global values from the ORMS color Parameter to control all Outline, Roughness, Metallic, Shading values. - ORMSColor
A color selection for setting mask values globally. Only visible if a channel is overridden below or the ORMS map is disabled. - Outline, Roughness, Metalness, ShadingMaskChannel
Use checkboxes to select which channel should be sourced for each feature. One and only one channel must be checked per feature but multiple features can sample the same channel. - Override Outlines, Roughness, Metallic, Shading
Enable these to use the selected Channel from the ORMSColor parameter above to control features globally instead of the texture map.
You can use these parameters in different combinations to enable the use of a variety of differently packed textures. You can use one channel for multiple features or even disable the map completely and set your values globally per channel in the ORMS Color Parameter if you do not have or do not wish to use an ORMS map.
Metallic
Metalness uses a fake reflection MatCap – A greyscale image that acts as a fake reflection map useful for shiny materials. You can choose from existing MatCap texturs or make your own.
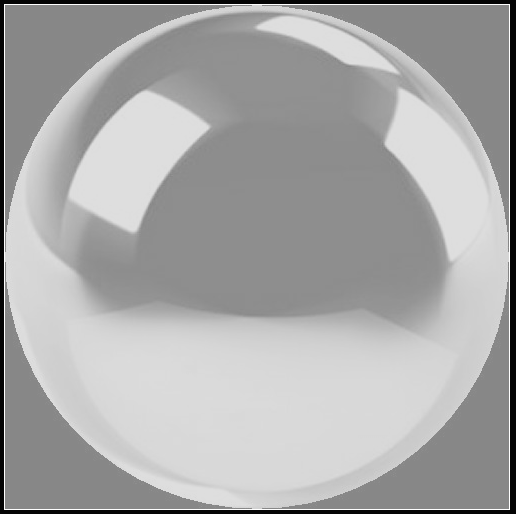

- MatCap – Assign the Reflection Texture
- MetallicContrast – Adjust the contrast effect in metallic regions.
Opacity Map (Suffix _Opacity)
Ensure that the compression setting of this texture is set to “Alpha” in Unreal
If you need a separate opacity mask you can enable “UseOpacityMask” in the material instance. This is the only way to introduce an Opacity mask when using the custom color system (When UseBaseColor is disabled)
The rivals standard material uses Masked blending mode, which means there are no semi transparent (translucent) pixels. Instead transparency acts as a binary discard mask, values in between 0-1 are rounded up or down based on the Opacity Mask Clip Value which by default is set to 0.333.
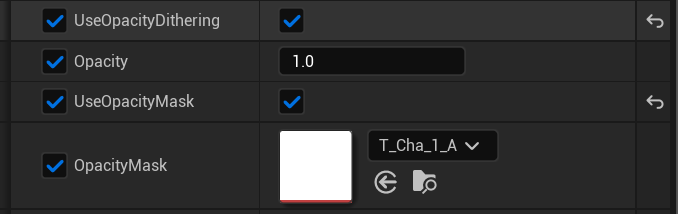
- Use Opacity Dithering – Switches Alpha channel from a binary cutout mask to a dithered (Feathered) cutout mask – simulates translucency
- Opacity – When Dithering is enabled allows a global adjustment to translucency
Pixel Art or Retro Textures
If you are trying to achieve a sharp pixelated visual you will need to open your Textures in Unreal and set your texture filtering to “Nearest” and set MipGenSettings to “NoMipMaps”.
You will also need to set your Material Instance to “UseCustomSamplers”. If you do not set this the Material Instance will override the texture settings by default and use bilinear filtering instead which will cause them to look smooth.
Vertex Color
Ensure that mesh has the vertex color import setting set to “Replace” in Unreal and reimport your mesh if it was not set initially.
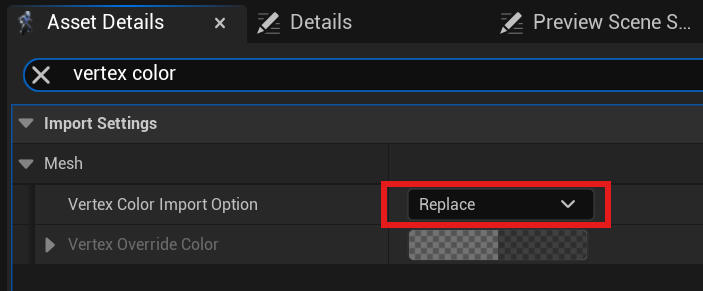
Vertex Colors are not a texture but instead are color values (RGBA) stored on each vertice of a model. They are often used to control masking of various effects in game engines.
It is possible to use Vertex color in place of or in addition to color maps, you can enable it via the “UseVertexColorMap” on your materials.
Note: If you wish to use vertex colors exclusively, ensure that your base color is set to white. By default the BaseColor map and custom Colors are grey and multiplying against this will make your Vertex colors look darker than intended.
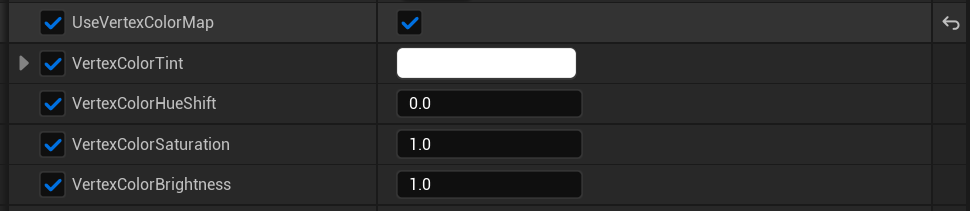
- UseVertexColorMap – Enables use of vertex color, uses a multiply blend against the color map or custom colors. When enabled, vertex color alpha will contribute to opacity as well.
- VertexColorTint – Tints the texture with the selected color – works like a Multiply layer
- VertexColorHue – Shift the hue (Color) after the tint result
- VertexColorSaturation – Increase or decrease the Intensity of color
- VertexColorBrightness – Increase or decrease the brightness